Paper Bag Halloween Crafts · Craftwhack
Halloween is a wonderful time of year, and if you've got a pile of paper tiffin bags, you might be wondering if there are any crafts you can exercise with your little one to turn your bags into astonishing (and inexpensive) decorations.
Some of these crafts can fifty-fifty be used to hand out treats in, making your house a specially special one on the block! Even if you seal the handbag, yous could always cut a pocket-size pigsty in the top to add sweets and let picayune fingers dip in.
With that in mind, permit's look at some great newspaper bag Halloween crafts.
Frankenstein'due south Monster Bag
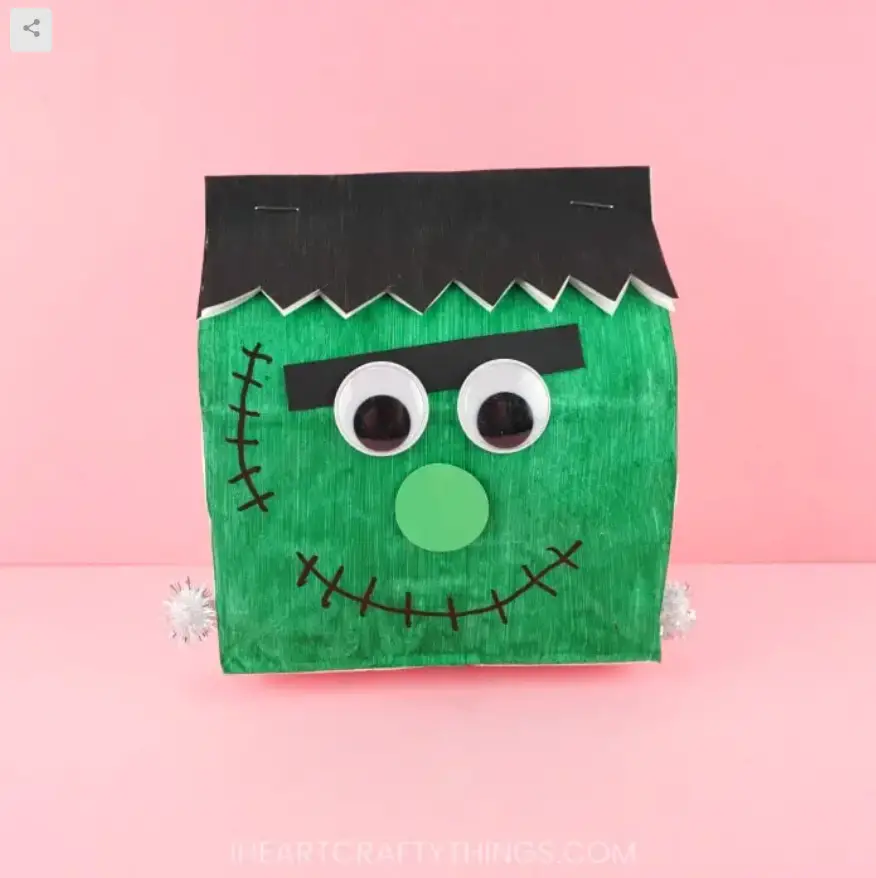
Source: https://iheartcraftythings.com/newspaper-purse-frankenstein-arts and crafts.html
If your child is a big fan of Frankenstein's Monster, this is the perfect bag for you to create together. You tin can either stuff the pocketbook with newspaper to requite it shape and solidity or slip in some sweets and pass it and its fellows out to play a trick on or treaters.
Materials
For this arts and crafts, you will need:
- Black paint
- Green paint
- Paintbrush
- Black carte du jour
- Green menu
- Glue
- Googly eyes
- Black pen
- Silver pom poms
- Scissors
- 1 paper luncheon pocketbook
- Paper (for stuffing)
Step one: Paint Your Bag
Assist your kid to paint the bottom half of one side of the lunch purse light-green. Leave information technology to dry and then paint the other side green too.
Echo this on the superlative half, but using black paint, and then one-half of your pocketbook is green and the other half is black. Y'all are and then going to fold the superlative down. If you desire to make the bag finished rather than use it as a trick-or-care for pocketbook, stuff it with newspaper and and then staple or glue the peak close at this point.
Step 2: Give Frankenstein's Monster A Haircut
Next, help your child trim a series of triangles into Frankenstein'south Monster's hair and then that he has shaggy pilus all forth the height edge of the handbag. You may want to cut quite a lot off so that he just has a trim at the pinnacle of his head, rather than a length of the black bag.
Step 3: Glue The Eyes On
Get your child to stick the optics on beneath the Monster's hair, and and so assist them to depict on a nose and either a large smile or a scowling stitched mouth. Add vertical lines across the oral fissure to represent the stitching.
Assistance them ink some heavy eyebrows above the googly eyes (or fifty-fifty stick black card eyebrows on top) and then draw some other areas of stitching onto the face in random places.
Step 4: Glue The Bolts
The easiest way to brand bolts for Frankenstein'due south Monster is to use silver pom poms, merely y'all could too make some little silvery bolts out of aluminum foil or silver card if you don't have any pom poms. Glue them low downwardly, well-nigh the lesser of the purse.
Paper Handbag Bat
Source: https://iheartcraftythings.com/stuffed-paper-bag-bat-craft.html
Anybody loves bats, and they come up into their element for Halloween, so how most a paper bag bat? If you've got plenty of black paint, this is the perfect craft to practice with a child, and y'all could even hang a flock of these up on the ceiling to brand a spooky Halloween ornament.
Materials
A paper handbag bat will require:
- ane paper bag
- Black paint
- Paintbrush
- White carte du jour
- Googly optics
- Stapler
- Glue
- Blackness card
- Paper (for stuffing)
- Clear fishing wire (for hanging with)
- Pencil
- Scissors
Stride 1: Pigment Your Bag Blackness
Help your child paint the handbag black all over so that it'southward ready to be turned into a bat. You lot may demand a couple of coats, allowing the paint to dry in between so that it doesn't smudge. If you make the bag too wet, it may tear.
Step 2: Cutting Out The Ears
In one case the bat is dry, turn the bag over and draw large triangles at the top for ears using your pencil. Cut these out and then finish the top of your bat's caput.
Step 3: Stuff The Bag
Make full the bag with slightly crumpled newspaper, and then staple (or gum) the top parts and then that the bag is held shut and yous've got a nicely divers bat shape. The glue will look neater if you have the fourth dimension and patience, but it does take longer to dry out.
Step 4: Gum The Eyes And Add Teeth
Help your child glue the googly optics to the front of the bag, so assist them in cut 2 abrupt teeth out of a white carte. These want to be stuck to the front of the bat's confront. If you're feeling particularly chilling, get your kid to add some fiddling drops of claret to the tips to plow it into a vampire bat.
Stride 5: Cut Out The Wings
Accept your black card and cut out 2 nice, large wings to glue to the back of the paper pocketbook. You can go for cartoon-y or very realistic; it's up to yous! Consider gluing the wings for neatness, or just use your stapler if you're aiming for a quick craft.
Step 6: Hang Upward The Bag
You can hang the bat upwards either upside downwards or the right way up. If yous've got a flock of bats, consider doing a mix and then that some of your flocks are roosting and others are swooping overhead.
You may want to curve the wings effectually the ones that are roosting and get out the other bat wings spread out. You tin also hang the bats at different levels, making some low enough that your guests might brush against them.
You lot can add some little cardboard feet if you desire to, but this is optional. If you lot practise want to, cut some triangles out of the black bill of fare, and cut toes out of them, and then glue them to the bottom of the bat.
Light-green Paper Bag Spider
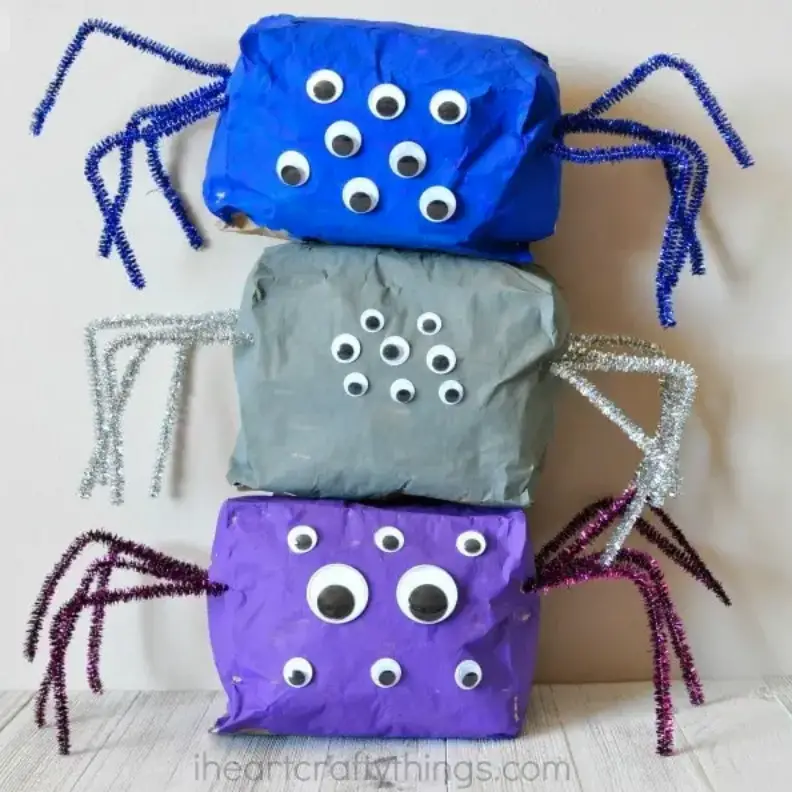
Source: https://iheartcraftythings.com/stuffed-paper-bag-spider-arts and crafts.html
Halloween wouldn't be Halloween without a spider or 2, and paper pocketbook spiders are both uncomplicated and very constructive. Use them as decorations, or but have fun crafting them with your kids. Once again, these are bully to hang up where they can merely brush people's heads and give them a fear!
Materials
You're going to need:
- 1 paper bag
- Green paint
- Paintbrush
- Lots of googly eyes
- Dark-green and xanthous pipe cleaners
- Paper for stuffing
- Scissors
- Stapler
- Glue
- Gray yarn
- A scrap of white card
Step 1: Paint The Paper Bag
Paint the paper bag brilliant light-green, as acidic as possible. Y'all will need to help your child to make sure they don't smudge the paint and let it dry as y'all move between sides. You can make your spider other colors, but green is a very effective one for Halloween.
Footstep 2: Stuff The Bag
Stuff the bag full of newspapers until you have a foursquare-shaped spider, and so fold down the peak and curlicue information technology neatly.
Staple the bag close and turn information technology over then that the stapled function is underneath; this volition give yous a neat spider.
Step 3: Cut Your Pipe Cleaners In Half
Cut your pipage cleaners in half and so get your kid to curve them at correct angles. Gum the legs to the spider at unlike angles, and get one or two waving upward in the air. Yous can either alternate your green and xanthous or put the yellow ones at the front.
Footstep four: Glue The Eyes To The Front
Help your child choose a selection of eyes in different sizes and colors, and gum them to the front end of the purse. You lot can do any order or layout, and if y'all're making multiple spiders, vary it.
Next, cut some little curvy fangs out of a white menu, and and so glue these to the front of the spider's face. Add together a fleck of green paint to represent the spider'due south venom. Y'all tin likewise add a black line along the spider's back for extra ornament.
Step 5: Hang The Spider Upwards
Cut a length of gray yarn and glue it to the back of the paper bag so that your spider dangles downwardly from the ceiling, and you lot've got a spooky decoration all done! Make a whole host of different colors, and terrify your guests.
Ghostly Paper Bag
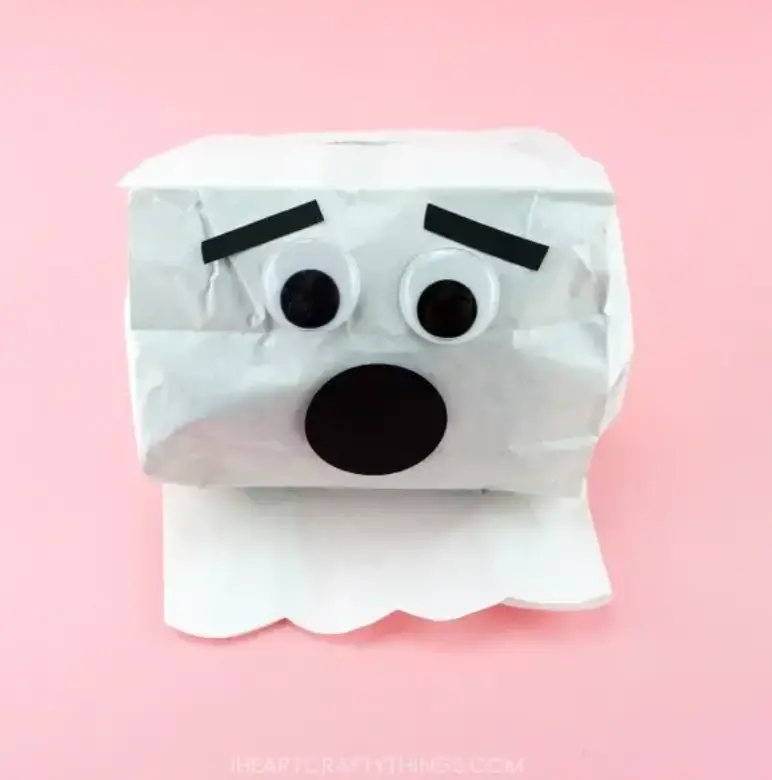
Source: https://iheartcraftythings.com/simple-paper-bag-ghost-craft.html
This is one of the simplest paper bag crafts. If you lot tin source white paper bags, they are even easier. If not, whip out the white paint and get crafting!
Materials
You're going to demand:
- 1 paper bag
- Googly eyes
- White carte
- Black marking
- White tissue paper
- Scissors
- Stapler
- Gum
- White cotton
Step one: Pigment The Bag If Necessary
If you demand to pigment your pocketbook white, do that first; y'all may need a couple of coats, particularly if your paint is thin. Now, turn your handbag upside down then that the serrated border becomes the bottom of the ghost, and what was the lesser of the handbag becomes the ghost's head.
Footstep 2: Glue The Googly Eyes
Stick the googly optics to the front, and and so draw some black circles around them to brand your ghost look hollow and sickly.
Next, aid your child draw a wailing mouth underneath the ghost's eyes.
Pace 3: Cutting Out The Hands
Cut out some ghostly artillery from white cards. If y'all make the edges of these wavy, they will look more than frightening and insubstantial.
These are going to be glued to the back of the bill of fare to brand them overnice and neat. Get your child to help yous mucilage them at different angles, and if you lot want your ghosts reaching forwards, create a crease in the arms then that the creepy fingers stretch toward your guests.
Pace iv: Hang Them Up
Adjacent, glue the white cotton fiber to the acme of the ghost's head so that you tin hang it upwardly.
Pace five: Mucilage The Tissue
Become your child to tear off some long strips of white tissue paper and glue these to the paper bag in trailing tendrils that volition palpitate spookily in the wind.
Light Up Pumpkin Bag
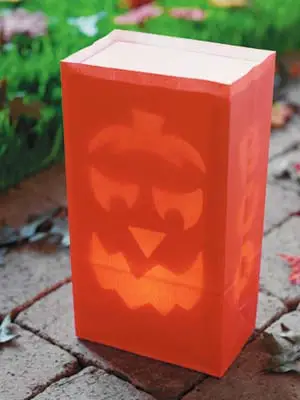
Source: https://blog.privateislandparty.com/halloween-crafts-paper-pocketbook-jack-o-lanterns/
If y'all haven't got a pumpkin to carve, you can make a slap-up paper lantern out of a newspaper bag and some orange paint.
Materials
Yous're going to demand:
- one paper purse
- Scissors
- Orange paint
- Paintbrush
- Pencil
- Some glue
- 1 electric candle
- A bit of green card
Step 1: Paint The Purse
Get your child to paint the bag orange (as always, leave fourth dimension for both sides to dry properly). Add together a bit of glue to your orange paint to stiffen the paper bag so it will stand up well. You tin likewise insert some lolly sticks to brand it stand up better if necessary.
You are going to be standing the bag upside down, so invert it and so that the bottom of the bag is the top of the craft.
Step 2: Cut Out The Face
Get your child to describe a scary face up on the forepart of your Jack O' Lantern, and and so cut it out advisedly using sharp scissors or a craft knife. Don't allow your kid utilize the knife or scissors as this could be quite fiddly and they may hurt themselves.
Brand sure you just cutting through the front layer, rather than both.
Step iii: Glue The Stem
Cut out a pocket-size, slightly curvy stem from the green menu and glue it to the tiptop of the handbag to represent the pumpkin's stem.
Step 4: Stand up It Over The Electric Candle
Turn on your petty electrical tea light and stand the purse over it. Practise not apply a real candle with a flame for this craft, as information technology's highly flammable and could pose a serious fire risk.
Mummy Bag
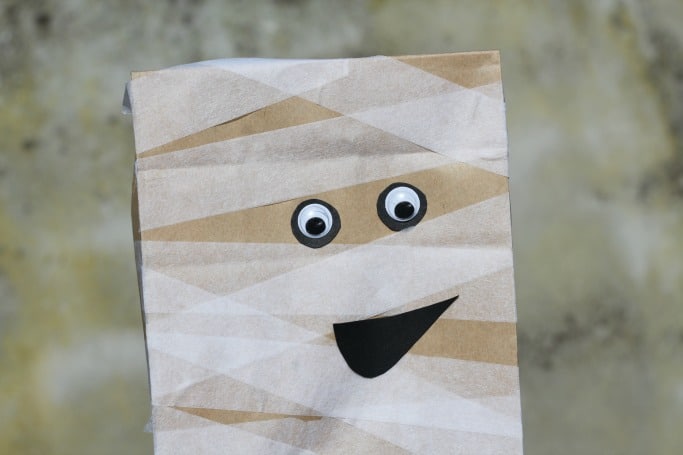
Source: https://www.craftsonsea.co.united kingdom/paper-purse-mummy-puppet-craft-for-kids/
For perhaps the simplest of all these crafts – or at least the i that requires the to the lowest degree pigment – consider a paper purse mummy. You tin can apply these equally souvenir bags to hand out treats very hands.
Materials
You're going to demand:
- 1 paper pocketbook
- White tissue paper
- Black marker
- Googly optics
- Mucilage
Step ane: Turn The Bag Over
If you want a neater version of this craft, you can turn your paper bag over, mucilage the open up end, and cut a fiddling slot in the top – or you tin can proceed things simple past just making your mummy with the serrated edge of the pocketbook at the top. You may desire to trim the serration off to have a smooth edge.
Step 2: Mucilage The Googly Eyes
Get your child to describe two black circles on the bag with the marker pen, most two-thirds of the way upward the bag. Adjacent, glue the googly eyes to these circles, giving the mummy a "haunted" look.
Depict a little mouth underneath.
Step 3: Encompass The Bag In Tissue Bandages
Adjacent, get your child to tear off strips of white tissue to wrap around the bag, and glue these in place. The effect can be equally haphazard and lopsided as you like, and you lot tin can leave $.25 dangling to show your mummy unraveling.
You're done! This bag is very elementary so you tin can make a whole pile of them if y'all're expecting lots of little guests.
Conclusion
Yous at present have a whole host of dissimilar craft ideas to practise with paper bags for Halloween, and whether you desire decorations to hand out to your guests or you're looking to decorate your living space for a wonderful Halloween political party, there are great, simple projects you tin do with your kid.
Happy Halloween!
Source: https://craftwhack.com/paper-bag-halloween-crafts/
0 Response to "Paper Bag Halloween Crafts · Craftwhack"
Post a Comment